
Shiplap Room Ideas That Aren’t Overdone
Shiplap interior walls have had a lot of love in recent years. Some would argue, even, that it’s received a bit too much love. But why exactly is shiplap so popular? What exactly is shiplap? How much shiplap is too much?
Shiplap is an ideal design solution not only for its ease of installation (hello, interlocking wood slats!), but also for its cost. It’s far cheaper than drywall, which means you can designate your remodel budget elsewhere while still getting a high-end look that you love. Plus, the clean lines, (usually) neutral colors, and simple-living aesthetic it’s a great way to add texture and change the room feel, no matter where it’s used.
Pin this for easy reference:

As wonderful as it is visually, like any trend, it can feel overdone and outdated if it’s used too widely. So, how do you use shiplap without overdoing the trend? Before you get out your nail gun, read on for our list of shiplap ideas and inspiration that will have you loving the look and admiring all of its unique installation possibilities.
RELATED: Wine Lover’s Lower Level
Vertical Shiplap Wall

RELATED: Best Greige Paint Colors – Our Top Grey/Beige Shades for your Home
If you thought shiplap was only a horizontal thing, think again! We love using this style in the form of vertical panels – especially in smaller spaces like mudrooms or bathrooms. Not only does it bring your eye upwards and help to open up the space visually, but it also adds a touch of class, similar to that of wainscoting.
Shiplap Bathroom Walls


RELATED: Simply White vs Chantilly Lace – Comparing Top White Paint Colors
One of the best elements of shiplap is its ability to keep a streamlined silhouette while still adding a pop of texture to a space. This bathroom is no exception. While the entire room is filled with a simple, neutral color palette, by playing with different patterns and textures, it is filled with visually interesting elements that instantly catch the eye. Plus, with shiplap that wraps around a space, it creates a sense of movement, enlarging the room as a whole.
Accent Walls

Shiplap Ceiling
If you’ve got a fixer upper with popcorn ceilings, this is the perfect place to add shiplap. If you’ve got a small space such as a small bathroom or laundry room, shiplap will make the space feel updated and fresh also adding an architectural detail.

RELATED: Neutral Paint Colors we LOVE and where to use them
Shiplap is also a fantastic solution if you’re looking to balance out a statement wall. Whether you have a fireplace feature wall or a large-screen TV in your living room or basement, the key to letting that space take center stage is to create a complementary statement wall to balance it all out. Shiplap is the perfect solution for this – especially in a white or neutral color palette. You can also use it on the ceiling to add texture and instant style.
Rustic Wood Ideas

Wood Shiplap Fireplace
RELATED: Sherwin Williams Iron Ore: A Review

Of course, true shiplap doesn’t always need to be white or even one solid color. We can’t tell you how often we’ve incorporated reclaimed wood into our projects because, well, it’s just so good. This remodeled lower level is instant proof. Paired with cowhide stools, exposed reclaimed wood ceiling beams, and ultra-comfortable theater seating, the shiplap backdrop behind the TV is a showstopper.
Paneled Sauna

It may not be the first thing that comes to mind when you think of shiplap, but specialty spaces like saunas or porches are excellent opportunities to incorporate this trend, but in a more natural and effortless way. Typically covering both the walls and the ceiling, an all-around wood panel look gives a space a calming aesthetic that evokes relaxation and a return to the environment outside our homes.
Subtle Backdrop


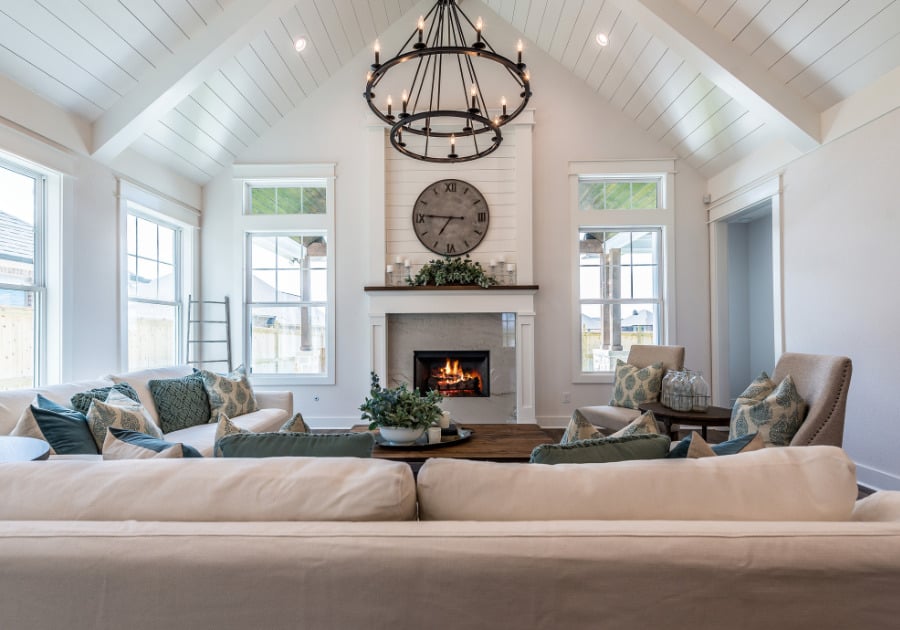
Another great use of shiplap that we are always on board for is its use as a subtle backdrop instead of all of the living room walls. In particular, when a room is extremely spacious with, say, floor-to-ceiling windows and cathedral ceilings, it can be difficult to fill the wall space. But lest you fill it up too much and end up with a cluttered aesthetic, shiplap is an amazing alternative. It is a good option to add just a touch of texture and visual interest, but still falls to the background and lets elements like custom cabinetry and lake views take priority.
Shiplap Fireplace

There are virtually limitless ways to design a fireplace. Stone, tile, brick, and more await. But why not consider using shiplap instead? Unlike tile or brick, it tends to be cut into much longer planks, which instantly gives your fireplace and room the illusion of being larger than it actually is. By using this style on a fireplace in the center of a room, your eye is immediately drawn to either side, creating length and space.
Wall Nooks
A good place to add character and style in a smaller space is by using shiplap. Keep in mind the design style of the rest of your home to make sure this design feature makes sense. Shiplap is more commonly used in modern farmhouse or coastal design and not typically used in contemporary spaces.
Whether they are reading nooks, breakfast nooks, or under-the-stairs nooks, are one of our favorite design solutions. And in our opinion, there are few additions to nooks more stylish than a layer of shiplap. The texture gives off the same feeling that a wallpaper-filled nook might, in the sense that it provides a point of visual interest. But unlike wallpaper, it still feels calm and pared down, allowing you to play with patterns and color infusions via other decor elements like throw pillows or dinnerware.

Shiplap Tub Walls

RELATED: Best Pink Colors
RELATED: Project Reveal: Bathroom Renovation
Enhancing your home with shiplap boards can add a touch of rustic charm and architectural interest. However, achieving a professional finish requires careful planning and execution.
Here are some essential tips to guide you through the process:
1. Selecting the Right Materials
- Shiplap Boards: Authentic shiplap boards feature rabbeted edges that overlap, creating a characteristic small gap between each board. If you’re aiming for a budget-friendly alternative, consider faux shiplap using plywood or MDF cut into strips. These materials can mimic the appearance of traditional shiplap when installed correctly.
- Adhesives and Fasteners: For a secure installation, use construction adhesives like Liquid Nails in conjunction with nails or screws. This combination ensures that the boards adhere firmly to the wall surface.
2. Preparing the Wall Surface
- Stud Location: Utilize a stud finder to locate and mark the wall studs. This step is crucial for anchoring the shiplap securely, especially if you’re installing heavier wooden boards.
- Surface Preparation: Remove any existing baseboards, outlet covers, and protruding nails. Ensure the wall surface is clean and dry to promote better adhesion of the shiplap boards.
3. Installation Process
- Starting Point: Begin at the bottom of the wall. Align the first board level, as it sets the foundation for the subsequent rows. A laser level can be particularly helpful in maintaining accuracy.
- Spacing: To achieve the desired small gap between boards, use spacers or coins. Consistent spacing contributes to the classic shiplap appearance.
- Securing the Boards: Apply a bead of Liquid Nails adhesive to the back of each board. Press it firmly against the wall, ensuring it’s level. Then, nail the board into the wall studs for added security. This dual method prevents future warping or detachment.
4. Addressing Obstacles
- Outlets and Switches: Before installation, turn off the power to any electrical outlets or switches on the wall. Measure their locations carefully and mark corresponding cutouts on the shiplap boards. Use a jigsaw to make precise cuts, ensuring the outlets are accessible post-installation.
- Windows and Doors: When installing shiplap around windows and doors, precise measurements are vital. Cut the boards to fit snugly around these openings. Adding trim can conceal any minor imperfections and provide a polished look.
5. Finishing Touches
- Filling Gaps: After all boards are in place, inspect for any visible nail holes or gaps. Fill these imperfections with wood filler. Once dry, sand the areas smooth to prepare for painting or staining.
- Painting or Staining: If you prefer a painted finish, consider applying a primer followed by your chosen paint color. For a natural wood look, select a stain that complements your interior decor. Always test the finish on a scrap piece to ensure satisfaction with the final appearance.
6. Room-Specific Considerations
- Dining Room Applications: Installing shiplap in a dining room can create a cozy and inviting atmosphere. Consider using vertical shiplap to draw the eye upward, enhancing the room’s perceived height.
- Ceilings: Shiplap isn’t limited to walls; applying it to ceilings can add depth and interest. This approach is particularly effective in rooms with high ceilings or as a solution to cover imperfections like popcorn ceilings.
7. Maintenance and Care
- Regular Cleaning: Dust the shiplap surfaces regularly to prevent buildup in the gaps. For painted shiplap, use a damp cloth for cleaning, avoiding harsh chemicals that might damage the finish.
- Moisture Control: In areas prone to humidity, such as bathrooms, ensure proper ventilation to prevent moisture-related issues like warping or mold growth.
By adhering to these guidelines, you can achieve a professional and aesthetically pleasing shiplap installation that enhances your home’s character and charm.

So, after all that inspiration, are you still on the fence about this ultra-classic trend?
No matter your thoughts, just remember that shiplap doesn’t have to be an exact replica of Joanna Gaines Magnolia style. You can use it in just about any way. Try it vertically, as a fireplace design, a focal point on a basement wall, or mixed & matched with unique graphic tile in a bathroom. There are so many possibilities, we don’t think the trend could truly ever get old.


One Response
Great post, Carla! I love the tips on balancing shiplap in a space. It’s such a versatile material, but I agree that too much can feel overwhelming. The examples you shared were really inspiring—especially the idea of using it as an accent wall. Can’t wait to try these ideas in my own home!